
New to Photography? Start Here.
Starting to take photography more seriously can be overwhelming, mostly because it’s difficult to know exactly where to start. You may have countless YouTube videos pulled up with camera reviews, editing tutorials, or 10-things-to-do guides. Before you do any of that, I’d recommend reading through this short starter guide. If anything, it’ll introduce or further familiarize you with some concepts that you’ll see in your continued photography education.
I’ve been taking & editing photos for a long time, and if I was starting over today, I’d want a resource like this just to set the lay of the land. It’ll focus first on practical, technical aspects then move into more about selecting cameras, things to be aware of, the basics of editing, and then finally some tips on how to accelerate your growth (hint: a lot of it is practice). I tried to strike a balance here where I don’t over-explain some very “Googleable” concepts (megapixels, sensors, 4K, etc.) so if you find a term you don’t know, just pause and look it up to learn more.
Feel free to use the quick links in the summary below to jump around. With that said, let’s get into it!
In this blog, I’ll cover:
Getting Started: Learning the Exposure Triangle, Camera Modes & White Balance
Beginner Cameras: Beyond Your Phone

Getting Started: The Exposure Triangle

Visualizing the Exposure Triangle
Although you can just pick up any camera, click it into Auto, and start snapping away, a sincere interest in learning photography should start with an understanding of the Exposure Triangle. Once you learn how each of the three sides of the triangle affect each other, you can make better decisions in the field about the right camera settings to get the best, sharpest, most useable photos. The three settings that make up the exposure triangle are: shutter speed, aperture, and ISO. I’m not sure if it’s a great analogy, but you can think of these three elements as ingredients for a cake recipe. Baking a cake needs the right balance of flour, sugar, and eggs. A good photo, similarly, needs the right mix of shutter speed, aperture, and ISO. I’ll break each down with some tangible examples.
Shutter Speed: Freezing or Blurring Motion
Shutter speed controls how long your camera’s shutter stays open when you take a picture. A fast shutter speed means the shutter opens and closes quickly, freezing motion. A slow shutter speed means the shutter stays open longer, letting in more light but also capturing motion blur.
How shutter speed affects your photos:
Fast shutter speeds (1/500s - 1/4000s) freeze action. Perfect for capturing sports, wildlife, or a dog mid-jump.
Slow shutter speeds (1/10s - 30s) let in more light and create motion blur. Great for capturing light trails, waterfalls, low-light scenes, or intentional motion blur.
Some tangible examples:
Imagine you’re shooting a soccer game… If you want to freeze the players in action, use a shutter speed of at least 1/1000s. If your shutter is too slow, your photos will be blurry.
Let’s say you’re photographing a waterfall… To get that smooth, silky water effect, use a slow shutter speed (like 1/2s or longer). You’ll need a tripod to keep the rest of the image sharp.
Now if you’re shooting a dark cityscape… A slow shutter (like 1/30s) can help brighten the image, but if you’re hand-holding the camera, you might get blur from your own movement.
Still running into blurry photos? Some additional tips:
If your photos are coming out blurry when shooting handheld, try using a shutter speed at least as fast as 1/focal length of your lens. For example, if you’re shooting with a 50mm lens, keep your shutter at 1/50s or faster.
Cameras or lenses with in-body-image-stabilization (IBIS) are more forgiving for handheld photography, even at 1/2s or 1s exposure times for those with steady hands.
Tripods are key for slow shutter speed work, as are neutral density (ND) filters and circular polarizer (CPL) filters. ND filters reduce exposure when doing day-time slow shutter speed photography (think about the waterfall example above). CPL filters help cut glare and reflections from the sun.
Aperture: Controlling Light and Depth of Field
Aperture is the size of the opening in your lens that lets in light. It’s measured in f-stops (like f/1.8, f/5.6, f/11, etc.). The lower the number, the wider the opening, meaning more light enters the camera. The higher the number, the smaller the opening, meaning less light enters. Aperture also affects depth of field, which is how much of your photo is in focus.
How aperture affects your photos:
Wide aperture (low f-number, like f/1.8 - f/2.8): Creates a blurry background (shallow depth of field), great for portraits.
Narrow aperture (high f-number, like f/8 - f/16): Keeps more of the scene in focus, ideal for landscapes. High depth of field.
Some practical examples:
Let’s say you’re taking a portrait of a friend. If you want that professional-looking blurred background, use a wide aperture like f/1.8 or f/2.8. That blur is called bokeh, and different lenses will render bokeh differently.
Now imagine you’re photographing a landscape. If you want everything from the foreground to the mountains in the distance to be sharp, use f/8 to f/16.
Finally, you’re shooting a group photo. A wide aperture (like f/1.8) might blur some faces in the back, so try f/4 or f/5.6 or higher to keep everyone in focus.
A wide aperture lets in more light, which is helpful in low-light situations. If your photo is too dark, opening up the aperture can help without needing to raise ISO or slow the shutter too much. Just note that you’ll also be reduce the depth of field of the image. You can probably tell already that the exposure triangle is a game of tradeoffs.
ISO: Your Camera Sensor’s Sensitivity to Light
ISO controls how sensitive your camera’s sensor is to light. A low ISO (like 100) keeps your image clean and free of noise (grain), while a high ISO (like 3200 or higher) brightens the image but can introduce noise. I’ll talk about it more later in this post, but my biggest advice is don’t be afraid of ISO when you need it!
How ISO affects your photos:
Low ISO (ISO 100 - 400): Best for bright outdoor scenes. Also best when you have the latitude to keep aperture open and shutter speed slower. Keeps images crisp and noise-free.
Mid ISO (ISO 800 - 1600): Useful in dim indoor settings or on cloudy days.
High ISO (ISO 3200 - 6400+): Helps in very dark environments or ones that require fast shutter speed, but may add digital noise or grain.
Here are some examples:
You’re shooting in bright sunlight. Use low ISO, like ISO 100 or 200 for the cleanest image. Adjust aperture and shutter speed accordingly.
You’re taking photos indoors at night. If there’s not enough light, and you don’t have a tripod to stabilize your camera, you might need to raise your ISO to 1600 or 3200 to brighten the image.
You’re at a concert. Since it’s dark and you can’t use flash, and you need a decently fast shutter speed, raising ISO to 3200 or 6400 helps capture the moment.
Some cameras handle high ISO better than others - typically full frame or medium format sensors. Since the sensors are larger, they can let in more light. Thanks to the photography software we have these days, even crop sensor cameras can have excellent low-light performance at ISOs of 6400+ so don’t be afraid to use ISO when necessary to get the right exposure.
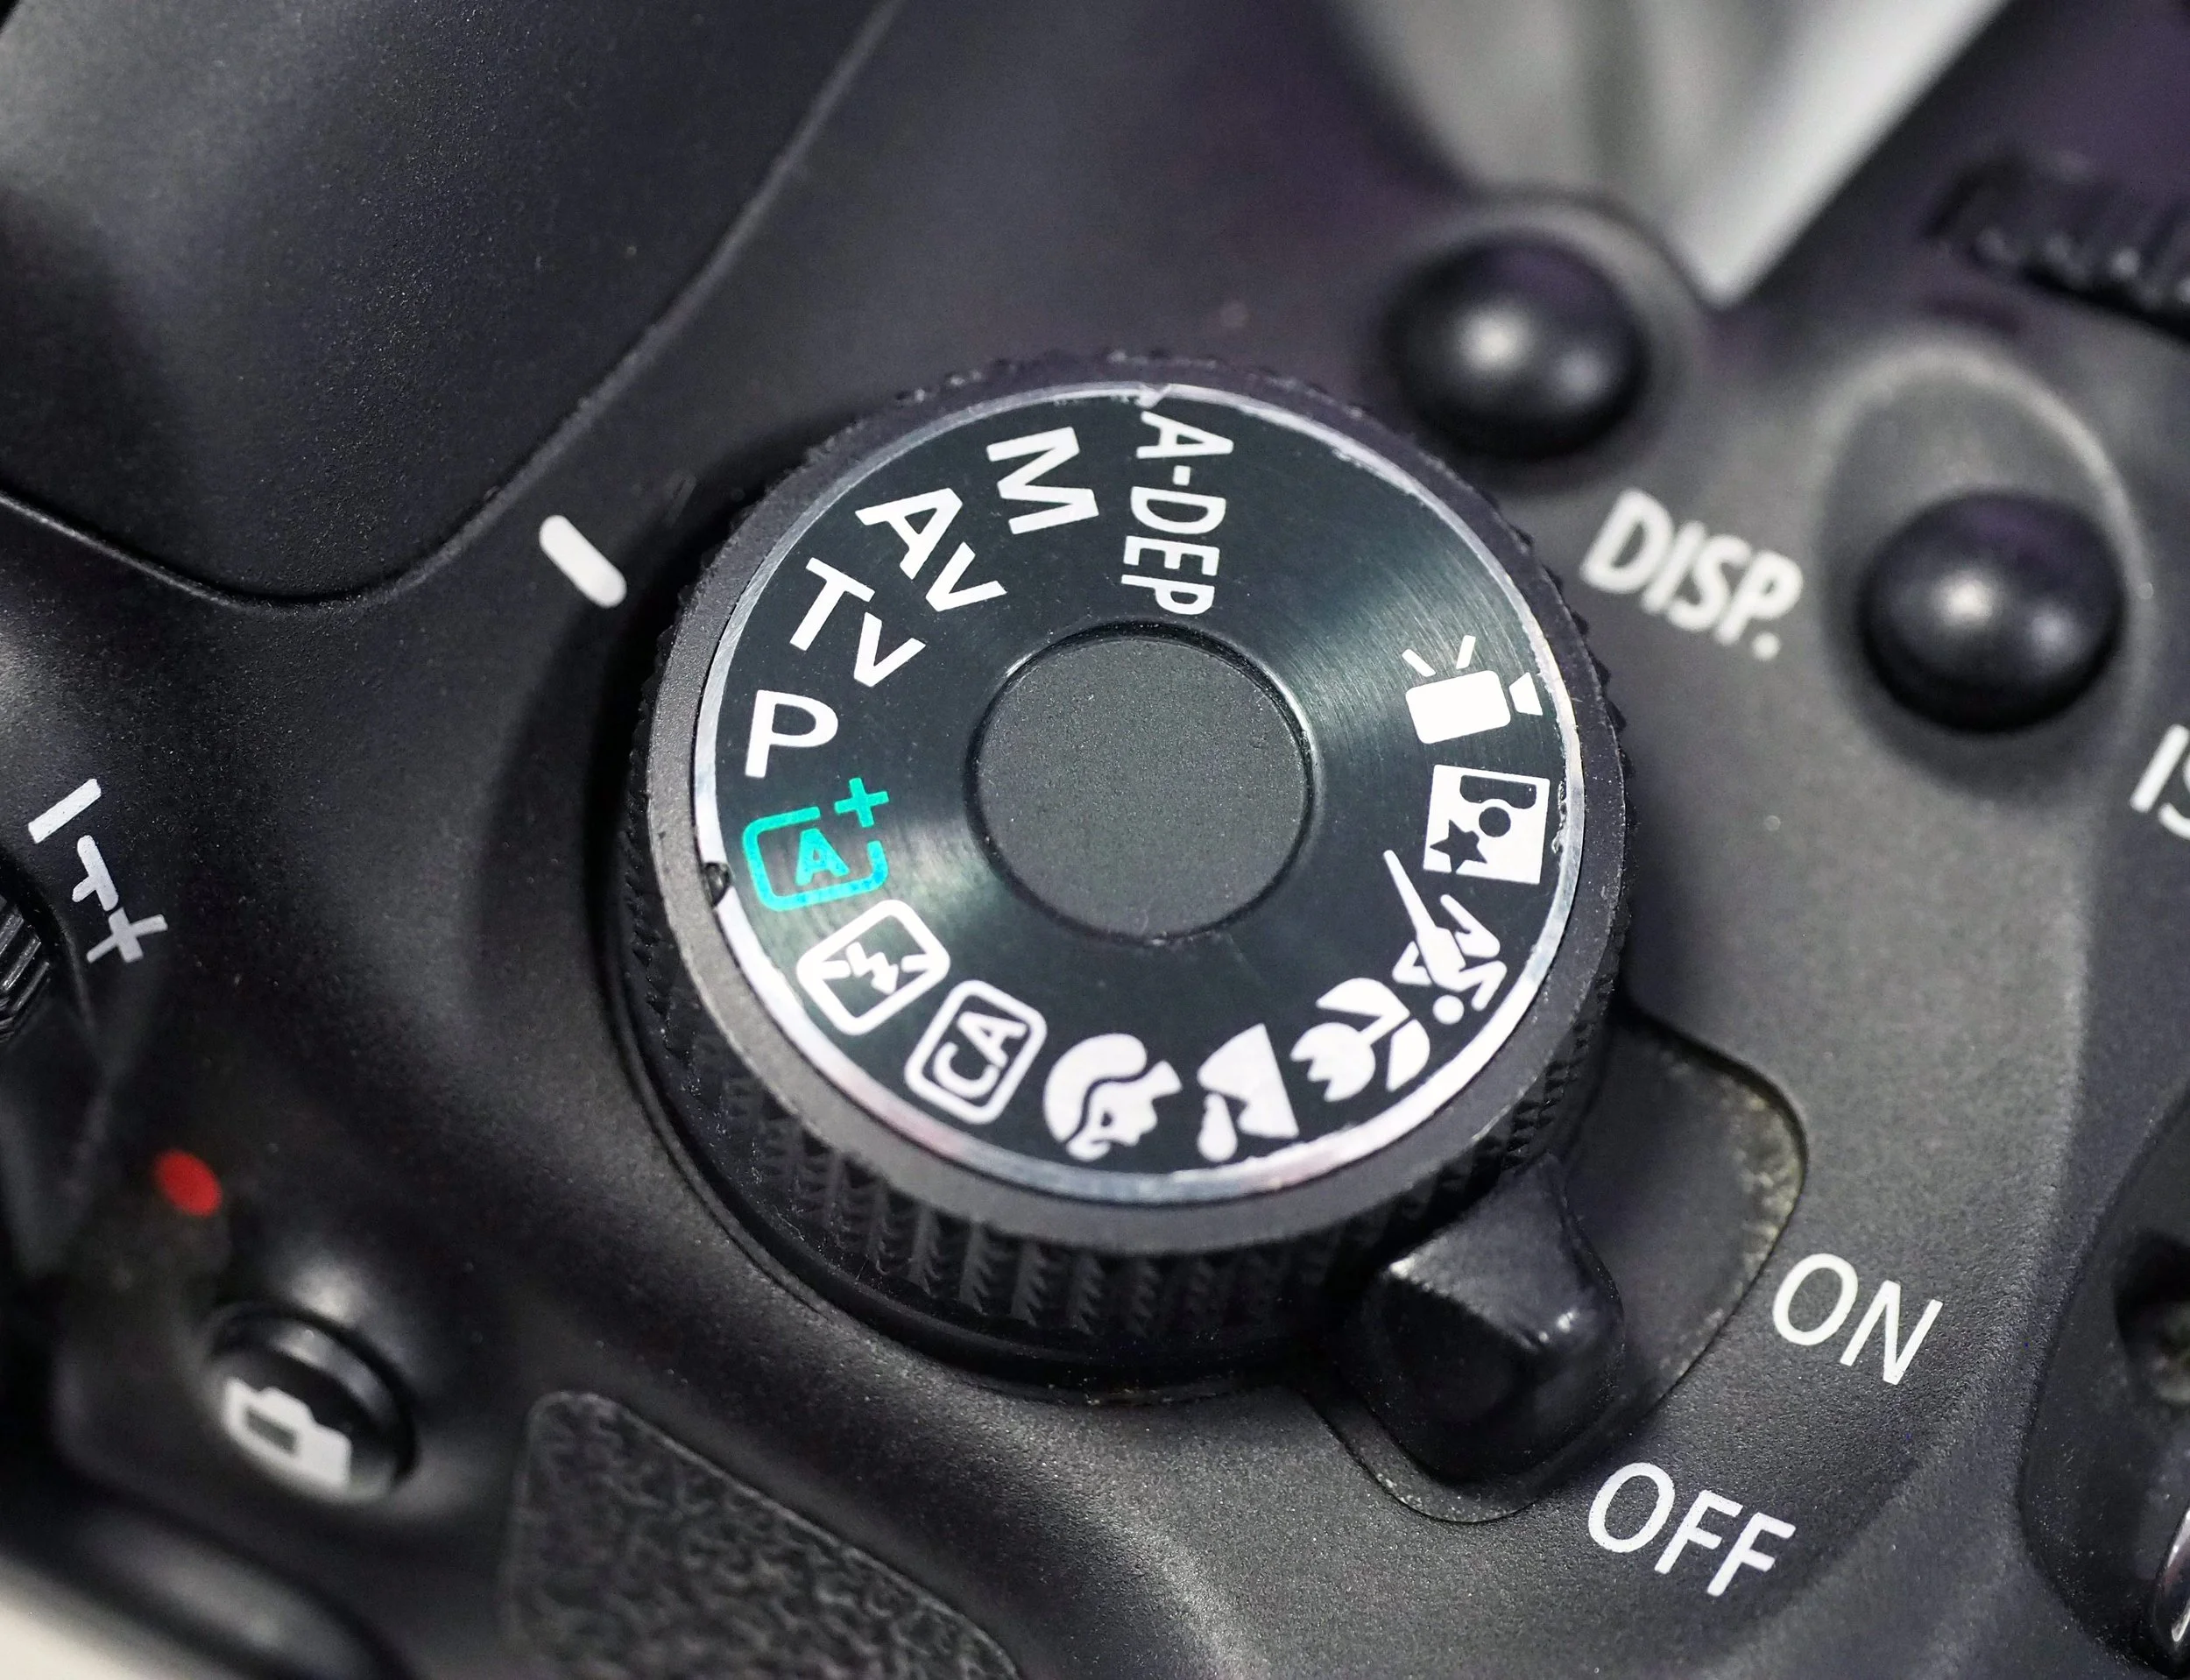
Camera Modes
Most modern digital cameras have a few camera modes: Auto, Program, Aperture Priority, Shutter Priority, and Manual. Generally when starting out, most people go from Auto to Program, then Aperture or Shutter Priority, then Manual. I’ll explain what the camera does on each mode with some examples.
Auto Mode: Just Snap Away
This is the mode most beginners start with. Your camera makes all the decisions for you: shutter speed, aperture, ISO, and even other settings like white balance. Don’t worry about white balance for now, I’ll cover it more later on.
When to use Auto:
You just got your camera and want a quick, decent shot in a well-lit scene without worrying about technical stuff.
You’re in a rush and don’t have time to adjust settings.
You’re handing your camera to a friend who has no idea how to use it.
The major downside of Auto:
You have no creative control. Cameras are generally pretty smart, but in dark scenes they could make poor decisions. It might pick settings that aren’t ideal, like using a slow shutter speed when you actually need a fast one to freeze motion. It may pick an ISO that over-exposes the scene. Or, it may choose an aperture that doesn’t sharply capture the desired depth of field. My advice: Auto mode is fine for quick snaps or if you’re just getting started, but if you want to get serious about photography, you’ll outgrow it fast.
Program Mode (P): Auto, But With Options
Think of Program Mode as Auto Mode with a bit more freedom. The camera still picks the shutter speed and aperture, but you can override some settings, like ISO and white balance.
When to use Program:
You have a better understanding of ISO (enough to set it yourself), so you’re comfortable letting the camera handle the rest.
You’re in a well lit or exposed scene and want to keep the ISO at a minimum, only letting the camera choose shutter speed and aperture.
The downsides of Program:
You still don’t have full control over depth of field or motion blur by letting the camera choose aperture and shutter speed. Program is a good stepping stone if you’re moving away from Auto but aren’t ready to dive into the modes I’ll cover below.
Aperture Priority Mode (A or Av): Now We’re Cooking
In Aperture Priority Mode, you control the aperture (f-stop), and the camera automatically adjusts the shutter speed and ISO to get a properly exposed photo. This mode is all about depth of field, choosing how much of your photo is in focus.
When to use Aperture Priority:
You have a good understanding of aperture and how it affects light as well as your depth of field.
You understand the exposure triangle well enough to know how changing your aperture will affect how the camera compensates with shutter speed and ISO.
When extremely slow or fast shutter speed isn’t needed.
The main downside of Aperture Priority:
If the light is too low, the camera might choose a slow shutter speed, which can lead to blurry shots if you’re not using a tripod.
Shutter Priority Mode (S or Tv): More Targeted Uses
In Shutter Priority Mode, you control the shutter speed and ISO, while the camera adjusts the aperture to maintain proper exposure.
When to use Shutter Priority:
Sports and action, where you need to quickly alternate quickly between different shutter speeds.
Low light situations, where you want to test how slow you shutter speed can go hand-held, while minimizing ISO.
The main downsides of Shutter Priority:
If the camera runs out of room to adjust the aperture (for example, if it hits its widest or narrowest setting), your exposure might not be great.
If there’s not enough light and your aperture is maxed out, you might need to manually raise ISO.
Manual Mode (M): The Mode to Work Toward
Manual gives you full control over shutter speed, aperture, and ISO. The camera won’t adjust anything for you, so you have to know how to balance these settings to get the right exposure.
When to use Manual:
Shooting in tricky or precise lighting (like night photography, star trails, or studio work).
When you’re at a point where you understand the exposure triangle well and want total creative control over how your photo looks.
Some downsides of manual:
Slower to adjust settings if the light is changing quickly. This is an issue even experienced photographers face.
There’s a learning curve, and it can be frustrating if you’re not used to it. That’s why it’s so important to learn the exposure triangle! But don’t feel like you have to use it all the time. Aperture Priority often get the job done faster, especially during good lighting conditions.
White Balance
White balance (WB) controls the color temperature of your photos. Different types of light have different color casts. Your camera tries to adjust for these differences so that white actually looks white instead of yellow, blue, or green. Additionally, you can set custom WB to get certain “looks” or styles.
Common light sources and their colors:
Daylight (Sunlight): Neutral, but can be warm or cool depending on the time of day.
Shade: Tends to be bluish.
Tungsten (Indoor Bulbs): Gives off a yellow or orange tint.
Fluorescent Lights: Can look greenish.
LED Lights: Varies from warm to cool.
If your white balance is set incorrectly, your camera might make everything look too warm (orange) or too cool (blue).
White balance camera presets:
Most cameras have a White Balance menu with preset options. These adjust the colors based on typical lighting situations. Here’s a few examples of what might be available on your camera:
Automatic (AWB): The camera will choose the WB based on its reading of the light in your scene.
Automatic (AWB-W): The camera will choose the WB based on its reading but bias toward more neutral, correcting for warmth in your scene.
Daylight: Best for shooting in bright sunlight. Keeps colors neutral.
Shade: Adds warmth to counteract the bluish tint of shadows or overcast light.
Tungsten (Incandescent): Cools down the yellow-orange tones of indoor light bulbs.
Fluorescent: Reduces the greenish tint from office-style fluorescent lights.
Cloudy: Warms up your photo slightly, making it great for overcast days.
Custom/Kelvin: Lets you manually fine-tune the color temperature for precise control. Depending on your shoot or purpose, it can be helpful to manually set the WB.
How to manually set your white balance:
Find something white or neutral: A white piece of paper or a gray card works best. You can even buy WB color cards if you’d like.
Go to your White Balance settings and select Custom White Balance.
Take a photo of the white surface in the lighting you’re shooting in.
Select that image as your white balance reference.
Your camera will now adjust colors based on that reference photo.
You can also use Kelvin mode, where you manually pick a color temperature. Lower numbers (like 3000K) make the image cooler (bluer), while higher numbers (like 7000K) make it warmer (more orange).
Fixing white balance in post (editing):
If you forget to adjust white balance while shooting, don’t panic. If you shoot in RAW format, you can fix it easily in editing software like Adobe Lightroom or Capture One. With RAW files, you can change white balance quite a bit without hurting image quality. If you shoot in JPEG, your options are more limited, so it’s better to get it right in-camera when possible.
Beginner Cameras: Beyond Your Phone
With so many options out there, picking your first “real” camera can feel overwhelming. Smartphone cameras are great these days, especially with the ProRAW photo option on newer iPhones. However, there’s nothing like the feel of using a dedicated camera. You don’t want to spend a fortune, but you also want something that’ll help you grow as a photographer. You might want to even pick something up that you can “grow into” as you get better. There are plenty of great beginner-friendly cameras that balance quality, ease of use, and price. Whether you want a compact point-and-shoot, a crop-sensor mirrorless, or even a full-frame camera, here are a few recommendations:
Canon R50 (2023): Best for Beginners Who Want Mirrorless Simplicity
Price: Around $800 with kit lens
Type: APS-C mirrorless, interchangeable lens system (Canon RF Mount)
Why It’s Great: Lightweight, easy to use, plus Canon’s reliable autofocus, the R50 is a solid choice if you’re moving up from a phone. It’s got a 24MP sensor, shoots 4K video, and has a fully articulating touchscreen, perfect for vlogging or selfies. Canon’s color science is very pleasing, so your photos will look great straight out of the camera.
Who It’s For: Beginners who want a simple, all-around camera that’s great for both photos and video.
Sony ZV-1 II (2023): Best Compact Point-and-Shoot for Travel & Vlogging
Price: Around $900
Type: Compact point-and-shoot, fixed lens system
Why It’s Great: If you want something pocket-sized but powerful, the Sony ZV-1 II is a killer choice. It’s got a bright f/1.8 lens, excellent autofocus, and a flip-out screen. The built-in ND filter is perfect for shooting in bright light, and it’s one of the best point-and-shoots for both photos and video.
Who It’s For: Travelers, vloggers, and anyone who wants amazing quality without carrying a big camera.
Fujifilm X-M5 (2024): Best for Those Who Love Retro Looks & Film Simulations
Price: Around $900 with kit lens
Type: APS-C mirrorless, interchangeable lens system (Fujifilm X Mount)
Why It’s Great: Fujifilm cameras are fun to use - I use three of them. The X-M5 has a 26MP sensor, in-body stabilization (IBIS), and Fujifilm’s famous film simulations on a dedicated dial that give your photos a unique look straight out of the camera. It has a classic design but modern features like a flip-out screen and 4K video.
Who It’s For: If you love travel, street photography, or want a camera with a film-like vibe, this one’s for you.
Nikon Z5 (2020): Best Affordable Full-Frame Camera - If You Know You Want Full Frame
Price: Around $1,300 with kit lens
Type: Full-frame mirrorless, interchangeable lens system (Nikon Z Mount)
Why It’s Great: Want a full-frame sensor without spending a fortune? The Nikon Z5 is one of the most affordable ways to get professional-level image quality. It has great dynamic range, a weather-sealed body, and Nikon’s Z-mount lenses are excellent. While it’s not the best for high-speed sports or 4K video (it has a crop in 4K mode), it’s amazing for portraits, landscapes, and low-light shooting.
Who It’s For: Beginners who want a serious camera for photography and plan to stick with full-frame in the long run.
Gear Acquisition Syndrome (GAS): Do You Really Need More Camera Stuff?
Ever found yourself scrolling through camera gear reviews, convinced that a new lens or body will instantly make your photos better? That’s Gear Acquisition Syndrome (GAS), the urge to keep buying photography gear, even when you don’t really need it. GAS is also the feeling that your current gear isn’t enough. Maybe you think a sharper lens, a better sensor, or the latest camera will finally take your photography to the next level… so you keep researching, watching reviews, and adding to your wish list instead of getting out and taking more photos.
GAS seems to be getting worse every year, namely because:
Marketing Tricks You. Camera brands want you to think your gear is outdated the second a new model drops.
Social Media Pressure. Seeing other photographers or influencers with fancy setups or doing unboxing videos makes you feel like you need the same gear to keep up.
Fear of Missing Out (FOMO). New autofocus, more megapixels, better low-light performance? Sounds great, but do you actually need it?
Avoiding the Hard Work. It’s easier to blame gear than practice. Instead of improving composition or lighting, you convince yourself you just need a better lens.
Buying Stuff Feels Good. Let’s be real, unboxing a new camera is fun. It might be my favorite retail therapy. But that feeling fades fast.
But wouldn’t new gear take better photos?
Yes and no. Better gear can improve technical quality, but it won’t make your photos more interesting. A great photographer with an old camera will take better shots than someone with top-tier gear and no idea how to use it. Upgrading makes sense when it solves a real problem:
You shoot low light events and need a camera with better high ISO performance.
You need a lens with a wider aperture or different focal length for your work, or it would open new creative doors.
Your current gear is holding you back in some other way.
How to stop feeling so GAS(sy):
Master What You Have. Push your camera to its limits before upgrading. Experiment, learn every setting, and get creative. The camera manuals are better than you think.
Rent Before You Buy. If you’re eyeing new gear, rent it first. You might realize it’s not as game-changing as you thought. Or, it might confirm for you that buying it is the right call.
Set a Gear Budget. Decide how much you’re willing to spend each year and stick to it. Prioritize purchases based on which will make the biggest impact on your personal work or business.
Ask Yourself: “Will This Actually Make a Difference?”. If your audience or clients won’t notice, do you really need it?
Invest in Experiences, Not Just Gear. Instead of buying another lens, spend that money on a photography trip. As a travel photographer, I can’t emphasize this enough. New environments, new subjects, new creative possibilities.
Stop Watching So Many Gear Reviews. If every video you watch makes you want to buy something new, take a break. Follow photographers who focus on creativity instead. Gear reviews are extremely popular because of our current addiction to consuming & GAS.
Camera Brand Fandom: Avoiding Toxicity in the Photography Community
If you've spent any time in photography circles, you’ve probably seen the never ending brand debates. Canon vs. Nikon. Sony vs. Fujifilm. DSLR vs. mirrorless. Crop vs. Full Frame. Some photographers talk about their camera brand like it’s their favorite sports team, defending it no matter what. But here’s the thing: your camera brand doesn’t define you as a photographer, and honestly, some of these fandoms are super toxic. Ultimately it’s your creativity, skill, and vision that make the photo, not the brand name on your camera.
Why do people get so attached to their camera brand?
The Investment Factor. Photography gear isn’t cheap. Once you’ve spent thousands on a camera body, lenses, and accessories, it’s hard to admit another brand might be doing something better. Nobody wants to feel like they backed the wrong horse.
Marketing Works. Brands spend big money making you believe their cameras are the best. And it works. Just like people argue over iPhone vs. Android, photographers get caught up in brand loyalty even when the differences aren’t that huge.
Online Echo Chambers. Spend enough time in camera forums, Facebook groups, Instagram, Threads, Youtube, etc. and you’ll see a lot of brand bias. People reinforce their own choices, and suddenly, it feels like "real photographers only use [insert brand here]". Rage bait, engagement bait, call it whatever but it’s toxic.
The Need to Justify Choices. Some photographers get defensive about their gear because admitting another brand has advantages feels like admitting their own setup isn’t good enough.
Does the camera brand actually matter?
Yes and no. Different brands have different strengths, but there’s no single “best” camera brand. The best camera is the one that fits your needs, shooting style, and budget. Each of these brands has things they’re known for or do well:
Sony: Fast autofocus, great low-light performance, cutting-edge tech, 3rd party lens availability.
Canon: Excellent color science, solid lenses, user-friendly, durable bodies.
Nikon: Great dynamic range, fantastic ergonomics.
Fujifilm: Great color science, classic film-like in-camera editing, great for street and travel photography, 3rd party lens availability.
Panasonic: Strong video features, great stabilization.
How to avoid this brand obsessed toxicity:
Focus on Photography, Not Specs. A good photographer can take a great shot with any camera, even phones. A bad photographer won’t magically get better with a top-of-the-line setup.
Use What Works for You. Forget what the internet says. If you love your camera and it gets the job done, that’s all that matters.
Avoid Toxic Gear Debates. There’s nothing wrong with discussing camera brands, but when it turns into a full-blown argument, just walk away.
Try Different Brands. If you’re curious, rent or borrow a different system. You might love it. Or you might realize your current gear is just fine. I’ve personally rented and used gear from Sony and Canon, and enjoyed both too.
Remember That Your Clients Really Don’t Care. If you’re shooting professionally, clients care about the results, not the logo on your camera. If your brand and gear allows you to execute the vision between you and your clients, you’re all good.
Editing: Bringing Your Photos to Life
Taking a great photo doesn’t stop when you press the shutter. Editing is where you bring your vision to life, fix blemishes, draw attention to your subject, and make your photos stand out. If you’ve ever looked at professional photography and thought, “Why don’t my images look like that?” editing is probably the answer. Importantly, editing isn’t a fix for bad photos (e.g. poor compositions, very extreme exposures) but rather about enhancing good ones. Every great photographer edits their work, and you should too, even if just a little. Getting started with editing can be daunting: there are so many sliders, tools, and techniques that it’s easy to get lost or discouraged. But, like any skill, editing can be learned and honed over time.
Why editing is important:
Every Pro Edits (Even Just a Bit). No matter how good a shot is straight out of the camera, every pro photographer edits their work. Even film photographers used darkroom techniques to tweak exposure, contrast, and color. Editing isn’t cheating, it’s part of the creative process.
Fixes Small Mistakes. Sometimes, a shot is almost perfect but needs a little help. Maybe the exposure is slightly off, the colors look dull, or there’s an unwanted distraction in the background. Editing lets you clean things up.
Brings Out Your Style. Editing helps define your personal look. Do you love moody, cinematic tones? Bright and airy edits? Bold, vibrant colors? Your editing style is what makes your work feel unique.
Makes a Huge Difference. A well-edited photo can turn a good shot into a great one. It’s the difference between nice and wow.
Editing basics:
If you’re new to editing, focus on the basics first. You don’t need fancy tricks or tons of presets, just an understanding of a few key adjustments.
Exposure & Contrast. Adjust brightness and contrast to make your image pop. If a photo looks too dark or washed out, small tweaks can fix it.
White Balance & Color. Colors can look off depending on lighting. White balance adjustments fix weird color casts, while HSL (hue, saturation, luminance) lets you tweak specific colors.
Cropping & Straightening. A great photo can look even better with a simple crop. Adjust your framing and make sure horizons are level.
Sharpening & Noise Reduction. Sharpening makes details crisper, while noise reduction helps clean up grainy images, especially from low-light shots.
Subtle Retouching. Got a distracting dust spot or a stray hair? A little spot healing can clean up small distractions without overdoing it.
Best editing programs for beginners (or anyone, really)
There are tons of options out there, but here are a few great places to start:
Adobe Lightroom. The most popular choice for photographers. Easy to learn and powerful enough for pros. There is a lighter version (Lightroom) and a more involved version (Lightroom Classic)
Capture One. A pro-level alternative to Lightroom with excellent color control.
Darktable. A free, open-source option similar to Lightroom.
Snapseed. A free mobile app with solid editing tools for quick fixes.
Luminar Neo. AI-powered editing that’s beginner-friendly.
Personally, I use Adobe Lightroom Classic, and I have been for almost a decade. I find the software, tools, integrations, and user interface to provide me with the most control over my image. Doing trials of different software will help you get a feel for what you like or what works best for you - but once you start getting deep into it, I’d be careful about switching softwares. It can be a big time investment to move your photo libraries between programs.
How to get better at editing photos:
Start Simple: You don’t need to do advanced edits right away. Focus on exposure, contrast, and color before diving into complex techniques.
Avoid Overediting: Too much contrast, saturation, or smoothing can make a photo look fake. Subtlety is key.
Learn from Others: Watch editing tutorials, study photos you admire, and try to recreate styles you like. Youtube is full of incredible free resources. This includes for more advanced techniques like masking and selective edits.
Create Your Own Presets: Once you find an editing style you love, save presets to speed up your workflow. Invest in a few presets from creators whose style you admire and may want to emulate.
Edit Consistently: The more you edit, the better you’ll get. Practice makes perfect.
Presets: Speed Up Your Editing, Plus Consistency
If you’ve ever scrolled through Instagram and wondered how photographers get that perfect look, there’s a good chance presets are involved. They’re one of the easiest ways to speed up editing and give your photos a consistent style. The best way to use them is as a foundation: apply one, tweak it to fit your photo, and develop your own style over time.
What’s a preset?
A preset is basically a saved collection of editing settings that you can apply to a photo with one click. Instead of manually adjusting things like exposure, contrast, and color every time, a preset does it for you. Think of it like a filter, but with way more control. Most presets work in editing programs like Adobe Lightroom, Capture One, or mobile apps like VSCO and Snapseed.
Why Use presets?
Saves time: No need to edit every photo from scratch.
Keeps your style consistent: If you want all your photos to have the same look, presets help big time.
Great for beginners: Even if you don’t fully understand editing yet, presets give you a solid starting point.
How to use presets in Lightroom:
Import Your Photo. Open Lightroom (desktop or mobile) and load the photo you want to edit.
Apply a Preset. In the Develop panel (desktop) or Presets tab (mobile), browse through your presets and click on one to apply it.
Tweak the Settings. Presets aren’t magic. Most of the time, you’ll need to adjust things like exposure, white balance, and contrast to make the preset fit your specific photo. More complex, but even more impactful, will be adjusting the color grading to make sure it’s to your liking.
Save & Export. Once you’re happy with the edit, save your photo and share it!
Where to find good presets:
Built-in Lightroom presets. A good starting point for understanding how they work.
Buy from photographers you admire and want to emulate. Many pros sell their own presets, and breaking down their presets can help you find your own style.
Create your own. Once you get the hang of editing, save your favorite settings as a custom preset.
Things to keep in mind when using presets:
Not every preset works on every photo. A preset that looks amazing on a bright outdoor shot might not work on a dark indoor one. Adjustments are always needed.
Avoid overediting. Some presets crank up contrast and saturation too much. If your photo looks unnatural, dial it back.
Presets don’t replace learning to edit. They’re a great shortcut, but understanding how editing tools work will help you get the most out of them. Additionally, break down presets and understand what they do versus blindly using them.
What’s In-Camera Editing?
In-camera editing is exactly what it sounds like: adjusting your photos inside the camera instead of using software like Lightroom or Photoshop. This can mean tweaking color, contrast, sharpness, or even applying a film-like look before you even transfer your images to a phone or computer. Some cameras let you edit RAW files after you’ve taken the shot, applying color profiles, exposure changes, or even cropping without needing extra software. Many cameras come with built-in color profiles that change how your photos look straight out of the camera. Some brands call them film simulations, while others call them picture profiles or creative styles.
Popular camera film & picture profiles:
Fujifilm (Film Simulations). Fujifilm is famous for its film simulations like Classic Chrome, Classic Negative, Provia, Velvia, and Acros. They mimic the look of classic Fujifilm film stocks, giving your shots a unique character straight out of the camera.
Canon (Picture Styles). Canon has Neutral, Portrait, Landscape, and more. Their Color Science is known for beautiful skin tones.
Sony (Creative Styles & Picture Profiles). Sony’s Standard, Vivid, and Neutral styles are great for photography.
Nikon (Picture Controls). Nikon’s Flat, Vivid, and Portrait modes help adjust contrast and saturation based on your style.
Panasonic & Olympus (Photo Styles). Options like Cinelike-D, Vivid, and Monochrome let you tweak the look before shooting.
How to use in-camera editing:
Pick a Film Simulation or Picture Profile. Scroll through your camera’s settings and choose one that fits the mood you’re going for. Want punchy colors? Try Velvia (Fuji) or Vivid (Sony/Nikon). Want a muted, cinematic vibe? Go for Classic Chrome or Flat.
Adjust Your JPEG Settings. Many cameras let you tweak contrast, highlights, shadows, sharpness, and noise reduction. Dial in the look you want before shooting.
Edit RAW Files In-Camera. Some cameras (especially Fujifilm and Nikon) let you edit RAW files inside the camera, adjusting exposure, white balance, film simulations, and more before saving a final JPEG.
Apply Filters or Effects. Some cameras even have built-in filters like toy camera, sepia, soft focus, or black & white modes.
Save & Share Instantly. Once you’ve got the look you want, transfer your photos to your phone using Wi-Fi or Bluetooth and post them right away: no editing software needed.
Keep in mind when using in-camera editing:
RAW vs. JPEG. In-camera edits apply to JPEGs, so if you want full control later, shoot RAW+JPEG.
Not All Presets Work for Every Scene. A film simulation that looks amazing in daylight might not work for low light.
Experiment. Play around with different styles to find what fits your vibe best.
How to Get Better at Photography, Faster
Getting good at photography takes time, but there are ways to speed up the learning process. It’s not just about having the right gear or watching endless tutorials: you’ve got to shoot with intention, experiment, and develop a style that feels like you. Here are some practical ways to level up your photography faster:
Experiment with Angles. Most people take photos from eye level because that’s how we naturally see the world. But if you want more dynamic, interesting shots, change your perspective.
Shoot from a low angle to make a subject look more powerful or dramatic.
Try a high angle for a unique storytelling effect, especially in street and portrait photography.
Use leading lines and framing by positioning objects in the foreground to add depth.
Overall, don’t settle for the first shot. Move around, crouch, climb, tilt your camera… find what works. The best photographers aren’t afraid to experiment. Especially with digital - there’s almost no downside to trying.
Don’t Just Take “Bangers” Shots. It’s easy to get caught up in chasing that one “perfect” shot, but real growth comes from shooting everything, not just highlights.
As mentioned above, experiment, experiment, experiment.
Take boring shots of everyday life. They help you train your eye for composition.
Capture different moods, lighting conditions, and subjects.
Learn to shoot in “bad” light: it forces you to problem-solve and work with what you’ve got.
Some of the best photographers don’t just capture big moments, they find beauty in the ordinary.
Build an Image Library & Curate. Instead of just posting your best shots and forgetting the rest, build a photo library. Capture different details in scenes, different angles, or scenes during different times of day. Find creative ways to showcase those details and tell better stories - like using collages or slices.
Organize your photos into folders or collections (by theme, location, mood, or project).
Curate your best work: not every photo needs to be shared. Pick the ones that tell a story and bring them together.
Revisit old shots with fresh eyes. Sometimes, a photo you overlooked months ago becomes a favorite. Especially as you get better at editing, you might be able to bring an old frame to life that you previously didn’t know how to approach.
The more you shoot and organize your work, the easier it becomes to refine your aesthetic.
Color Consistency Matters. If you want your photos to look polished and recognizable as your work, color consistency is key. Even if you shoot in different places or times of day, having a cohesive color palette makes your work feel more professional.
Pay attention to white balance: your colors will look off if it’s too warm or too cool, but whichever way you lean, be consistent.
Stick to a general color theme (earthy tones, vibrant hues, muted pastels, etc.) if you want your work to become more identifiable to you.
Look at your feed or portfolio as a whole: does it feel unified or all over the place?
You don’t need to make every shot look identical, but some consistency helps create a recognizable style.
Create Your Own Presets. Once you find a look you love, save time by creating your own presets. Instead of manually adjusting every setting for each photo, presets let you apply your signature style instantly.
In Lightroom, tweak your edit until it looks right, then save it as a custom preset.
Make different presets for different lighting conditions (daylight, low light, golden hour, etc.).
Adjust as needed: presets are a starting point, not a magic fix. Anyone who says otherwise is lying to you.
Having your own presets makes editing faster, keeps your style consistent, and gives your photos a professional touch.
Go Out and Shoot as Often as You Can. No amount of tutorials, YouTube videos, or gear upgrades will make you better if you’re not out there practicing. The more you shoot, the faster you’ll improve.
Challenge yourself to shoot every day, even if it’s just with your phone.
Give yourself mini-projects: photograph only one color for a day or focus on a single subject.
Step out of your comfort zone: if you love landscapes, try street photography for a change.
The key? Be consistent. Even if your early shots aren’t great, every photo you take is a step toward getting better.
Slow Down to Speed Up. Ironically, the fastest way to improve isn’t by rushing: it’s by slowing down and being intentional.
Instead of snapping a bunch of random shots, take a moment to compose your image.
Ask yourself, What story am I trying to tell? Why am I taking this photo?
Check your settings before shooting. Are you exposing evenly? Is your focus sharp?
By slowing down and thinking through your shots, you’ll develop better instincts, waste fewer frames, and improve way faster than if you just spray and pray.
Wrapping Up
I hope this was a helpful introduction to photography, especially where things are with digital photography in today’s world. Now, it’s time to continue your own research and get out there to shoot & learn!
Were there other things you were hoping to learn, or had questions about? What else would be helpful to know about photography or my photography journey? Let me know via Instagram DM or Email - my inboxes are always open. I’ll try and reply as quickly as possible.
Thanks for reading! Be well, and see you in the next post.