
My Secret to Sharper Fujifilm RAWs in Lightroom
If you’ve been editing Fujifilm RAW files in Lightroom for a while, you may have noticed that some of the fine details in your photos, like leaves or trees, seem to look “mushy” or “wormy”, resulting in weird artifacts or soft photos. Then, once you export the files out of Lightroom to JPEG, the files generally look better, but still not ideal. Now if you just look at the JPEGs written to the memory card directly from your Fujifilm camera, you largely get the result you’re expecting. Isn’t that weird, confusing, strange, annoying? This isn’t a new phenomenon for .RAF + Lightroom users, but it is certainly troublesome, especially for those of us who pixel peep a bit (guilty as charged).
So why is this artifacting happening? The mushiness you see is the result of Lightroom being poor at “demosaicing” Fujifilm RAW files, specifically from the X-Trans sensors. Demosaicing, or color reconstruction, is the process by which software like Lightroom uses a digital image processing algorithm to reconstruct a full color image from the incomplete color samples output from an image sensor overlaid with a color filter array (CFA). Basically, it’s the software interpreting, constructing, and then displaying the data from your RAW file into a viewable format. A camera’s firmware is doing this too, but you don’t (for the most part) edit on the camera. Generally, every photo editing software has their own demosaicing algorithm(s).
Poor Lightroom demosaicing can be beyond disappointing, especially when Lightroom has a great suite of tools and complementary products for creatives like Photoshop. I’ve tried Capture One, which is known to handle Fujifilm files better, but after almost a decade of using Lightroom I wasn’t ready to abandon Adobe, even with the expensive subscription pricing and constant increases. Thankfully, there are a few ways to better demosaic your Fujifilm RAWs to get the sharpest, cleanest starting point for your edits. Note that I’m not sponsored by any of the companies or brands mentioned, I’m just using what works best for me. Let’s get into it.
In this blog, I’ll cover:
My number one software choice for Fujifilm RAWs
Lightroom’s in-house solution
Other options you can explore, depending on your needs and interest
Why I’m still using Fujifilm + Lightroom despite these issues

The Solution: DxO Pure Raw 4 (and soon, Pure Raw 5)
I’ve been using DxO PR 4 for about a year now and it’s been a game changer for my Fuji RAW + Lightroom workflow. This time last year I was transitioning from part-time to full-time travel photographer, and I knew I wanted to get more detail out of my files, especially for client work. While the difference between a properly demosaiced Fuji RAW and a generic Lightroom interpretation isn’t very noticeable on social media or smartphones, it definitely is when images are printed or zoomed into. I researched many different software tools and even considered just using Lightroom’s raw details feature (more on that below). But once I came across DxO, I was set. Best of all, DxO charges a one-time license fee (no pesky subscriptions) and upgrades to a next version are discounted versus the price of a new license.
DxO’s demosaicing and denoise algorithm is the best I’ve seen for Fujifilm RAWs. With their Lightroom Classic plug-in, I can send a .RAF file directly to DxO for processing and have the new .DNG file sent straight back to the current collection I’m working in with just a few clicks. They have a few different algorithms to chose from, but I typically just use their top of the line one (currently, DeepPRIME XD2/XD). In addition to demosaicing and denoising, DxO will also try and correct for lens sharpness, vignetting, chromatic aberration, and lens distortion. I’ve been able to comfortably denoise images up to ISO 8000 while still enjoying the results.
One thing to be aware of when starting to use software like this is that a new .DNG RAW file is generated - sometimes upwards of 100MB for a 40MP Fujifilm RAW file from the X-T5. I’ve considerably upgraded my storage over the last few months, so it isn’t an issue, but I only run a file through DxO if I really need the detail or denoising.
I’m very excited about DxO’s new version, Pure Raw 5, coming soon on April 15, 2025. Specifically, DxO has invested in creating a specific algorithm for handling Fujifilm X-Trans files, called DeepPrime XD3 X-Trans (in Beta). While Adobe hasn’t spent too much time or effort trying to help Fujifilm RAW shooters, it’s great to see companies like DxO creating tailored solutions.
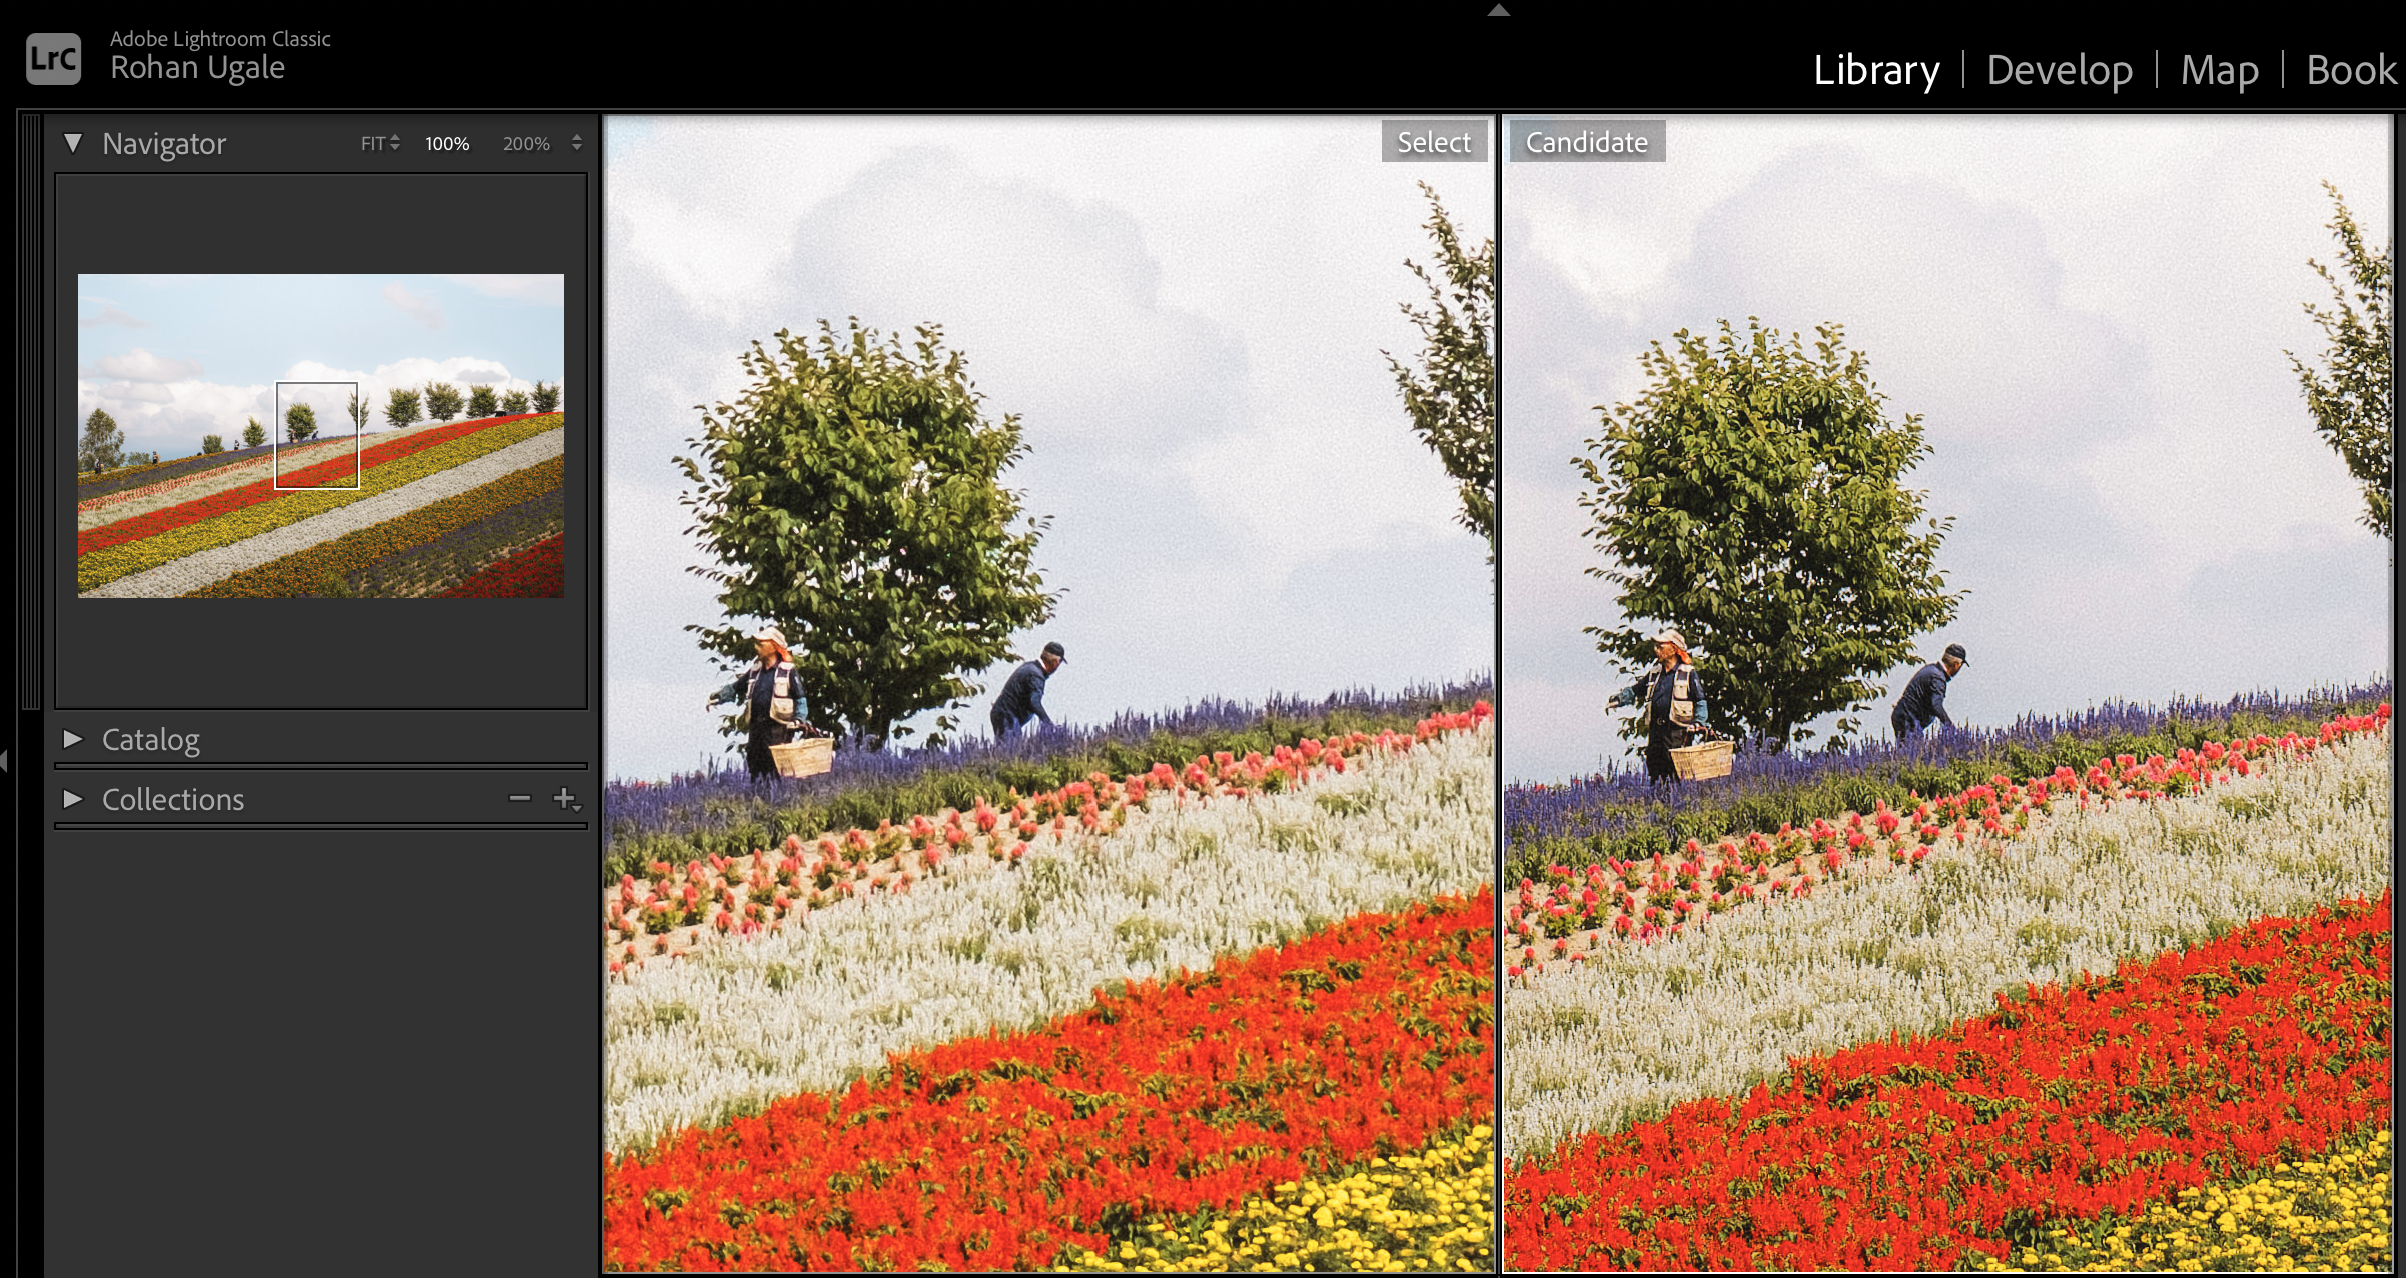
Here are some examples showing how DxO really punches out more detail. Both images have the exact same edits. On the left, Fuji RAF demosaiced by Lightroom & edited in Lightroom, on the right, DNG processed from DxO & edited in Lightroom.

Lightroom’s In-House Solution: Raw Details
A few years back, Adobe developed tools for Lightroom to help enhance RAW image quality, demosaicing, and noise reduction. Those tools are:
Denoise. This helps remove noise from an image, using Adobe’s AI algorithms.
Raw Details. Previously named Enhance Details, this punches in more detail, improves color rendering, better edge rendering, and fewer image artifacts.
Super Resolution. This helps create a larger image with similar quality as Raw Details but with 2x the linear resolution. This means that the new image will have 2x the width and 2x the height of the original image or 4x the total pixel count.
Raw Details in particular is comparable to DxO’s PR 4 algorithms. Although Adobe promises less artifacting, I found comparably more issues with results from their software versus DxO, especially with the finest of details (small trees in the distance, cityscapes with many buildings, etc.) The difference was enough for me to invest in DxO over using Lightroom’s in-house tools.
Super Resolution, on the other hand, has definitely been useful. For images that don’t contain a lot of trees/small buildings or other super fine details, I like that I can crop in considerably and then run a Super Resolution file to get an image that is still printable even in a larger size.
Other Options: Capture One, Iridient, Topaz, X Raw Studio
While ultimately landing on DxO, I tried quite a few different pieces of software over the last year to meet my demosaicing needs. Each of these are a bit different, from full-scale image editor to Fujifilm in-camera editing simulator.
Capture One
Demosaicing & RAW Processing. It is one of the most powerful RAW converters available, known for its high-quality demosaicing algorithms that deliver sharp details, accurate colors, and minimal artifacts. It excels at handling Fujifilm X-Trans sensor files, offering superior rendering compared to Adobe Lightroom, particularly in terms of preserving fine details without introducing artificial "worm-like" patterns.
Noise Reduction. It includes a strong built-in noise reduction tool that allows for both luminance and color noise adjustments. While it provides good results, it doesn't use AI-based noise reduction like Topaz Photo AI. However, its manual noise reduction controls allow for a balance between detail retention and smoothness.
Notes:
Excellent Fujifilm film simulation support.
Advanced color grading and tonal adjustments.
Layer-based editing and local adjustments.
Fast tethered shooting workflow, ideal for studio photographers.
Iridient X-Transformer
Demosaicing & RAW Processing. It is a specialized tool designed to convert Fujifilm X-Trans RAW files into high-quality .DNG files for further editing in Lightroom or other software. Its demosaicing algorithm is popular for extracting fine details and avoiding the worm-like artifacts that Lightroom sometimes produces with X-Trans files.
Noise Reduction. The software applies its own noise reduction algorithms during the conversion process, which can be fine-tuned based on preference. It provides better noise handling compared to Lightroom’s default RAW processing, especially when dealing with high-ISO Fujifilm files.
Notes:
High-quality sharpening algorithms to enhance details before importing into Lightroom.
Multiple demosaicing methods, allowing users to balance sharpness and artifact reduction.
Works as a pre-processing step rather than a full RAW editor.
Topaz Photo AI
Demosaicing & RAW Processing. It does RAW processing and denoising (see below) in one step, typically before using any of the other features of the software. They have their own proprietary algorithms and provide sliders to control the strength of the enhancement.
Noise Reduction. It excels in AI-powered noise reduction, using deep learning models trained on thousands of images. It can distinguish between actual image details and noise, leading to impressive high-ISO noise reduction while preserving sharpness. Unlike traditional noise reduction tools, it does not rely solely on luminance and chroma noise sliders but instead intelligently applies noise reduction based on the image content.
Notes:
AI-based sharpening to correct soft focus or slight motion blur.
Upscaling capabilities to enlarge images while maintaining detail.
Automatic subject detection and enhancement for faces, making it useful for portrait photography.
Fujifilm X-Raw Studio
Demosaicing & RAW Processing. It is unique because it doesn’t use your computer’s CPU for RAW processing. Instead, it connects to a Fujifilm camera via USB and uses the camera’s built-in image processor (X-Processor) to render the RAW files. This ensures that the output matches Fujifilm’s in-camera JPEG rendering, including film simulations and noise reduction.
Noise Reduction. Since it uses the same processing engine as in-camera JPEGs, the noise reduction is limited to what Fujifilm offers within the camera settings. While not as advanced as AI-based noise reduction, it provides natural-looking results and retains Fujifilm’s signature color science.
Notes:
Full access to Fujifilm film simulations.
Ability to tweak JPEG processing parameters like sharpness, highlight/shadow tone, and grain effect.
Batch processing capabilities for multiple RAW files.
No impact on computer performance since processing is offloaded to the camera.
Why I’m Still Using Fujifilm + Lightroom
Before using DxO, I was relatively content with Lightroom’s enhance and denoise features - enough to keep me from trying to learn to love Capture One. After finding DxO, however, I feel extremely confident about how much detail I can punch out of a Fuji RAW file in Lightroom. I personally find Lightroom’s color management features more than sufficient, and its masking features the easiest to use and most powerful of the available editing softwares. It’s also comforting to know that if I ever choose to switch systems in the future, DxO would only further help in the limited situations where maybe a Sony or Canon RAW had demosaicing issues in Lightroom.
As for shooting Fujifilm cameras, they still meet my needs perfectly. The combination of price, build quality, portability, image quality, and 3rd party lens selection makes it hard to consider other systems, especially since I travel so much and have to lug my gear around on my back. I know a lot of people like to change systems because they think it will unlock something for them creatively, and I don’t doubt it has worked for some. But I’ve had a good run of fighting off gear acquisition syndrome, and I hope to keep that going.
Right now, all I can think about is the images I want to create - and I have just the gear and software I need to do it.
Wrapping Up
Are you using any of these software tools to get better Fuji RAW files to edit? Are you not editing RAW files at all? What are other pain points you might be experiencing with Fujifilm RAWs or Lightroom? Let me know via Email or Instagram DM! My inboxes are always open, and I’ll try to reply as quickly as possible.
Thanks for reading! Be well, and see you in the next post.